How to Create Email Filters (Gmail, Outlook, Yahoo, Apple)
Update note (October 31, 2026): This guide was rewritten with an answer-first quick start, a four-provider capability matrix, corrected Gmail matching syntax (Gmail has no wildcards), and links to official documentation for every platform. Steps and limits were checked against each provider's official help documentation in October 2026.
Creating an email filter takes less than a minute. In Gmail, click the Show search options icon at the right end of the search bar, type a sender or keyword, click Create filter, choose actions such as Apply the label and Skip the Inbox, then click Create filter again. From that moment, every matching email sorts itself. Outlook, Yahoo Mail, and Apple Mail can do the same job under different names, and this guide walks through all four with exact clicks, a capability comparison, five presets you can copy as-is, and a quarterly maintenance routine.
Why Email Filters Are the Fastest Path to Inbox Zero
The average professional receives 121 emails per day, and only about a quarter of those messages actually matter, according to cloudHQ's 2025 workplace email statistics. The rest are notifications, newsletters, receipts, and threads you were copied on out of courtesy. Without a system, critical client emails get buried under that noise.
Email filters are automated rules that sort, label, archive, or delete incoming messages based on criteria you define. Once a filter exists, it runs on every new message without any daily triage from you.
Why Email Filters Save Hours Every Week
A widely cited McKinsey Global Institute report on the social economy (2012) estimated that the average interaction worker spends 28 percent of the workweek managing email. Filters do not shorten the emails themselves, but they automate the repetitive sorting around them. Automating even half of your incoming messages easily saves an hour a week, and it pairs well with other time management techniques that protect your focus time.
Gmail allows up to 1,000 filters per account, so a filter system has room to grow with your workflow instead of hitting a ceiling.
Step 1: Plan Your Filter Strategy Before You Build
Jumping straight into settings feels productive, but unplanned filters overlap, conflict, and miss messages. Five minutes of strategy up front saves hours of troubleshooting later.
Aggressive vs. Minimal Filtering Strategies
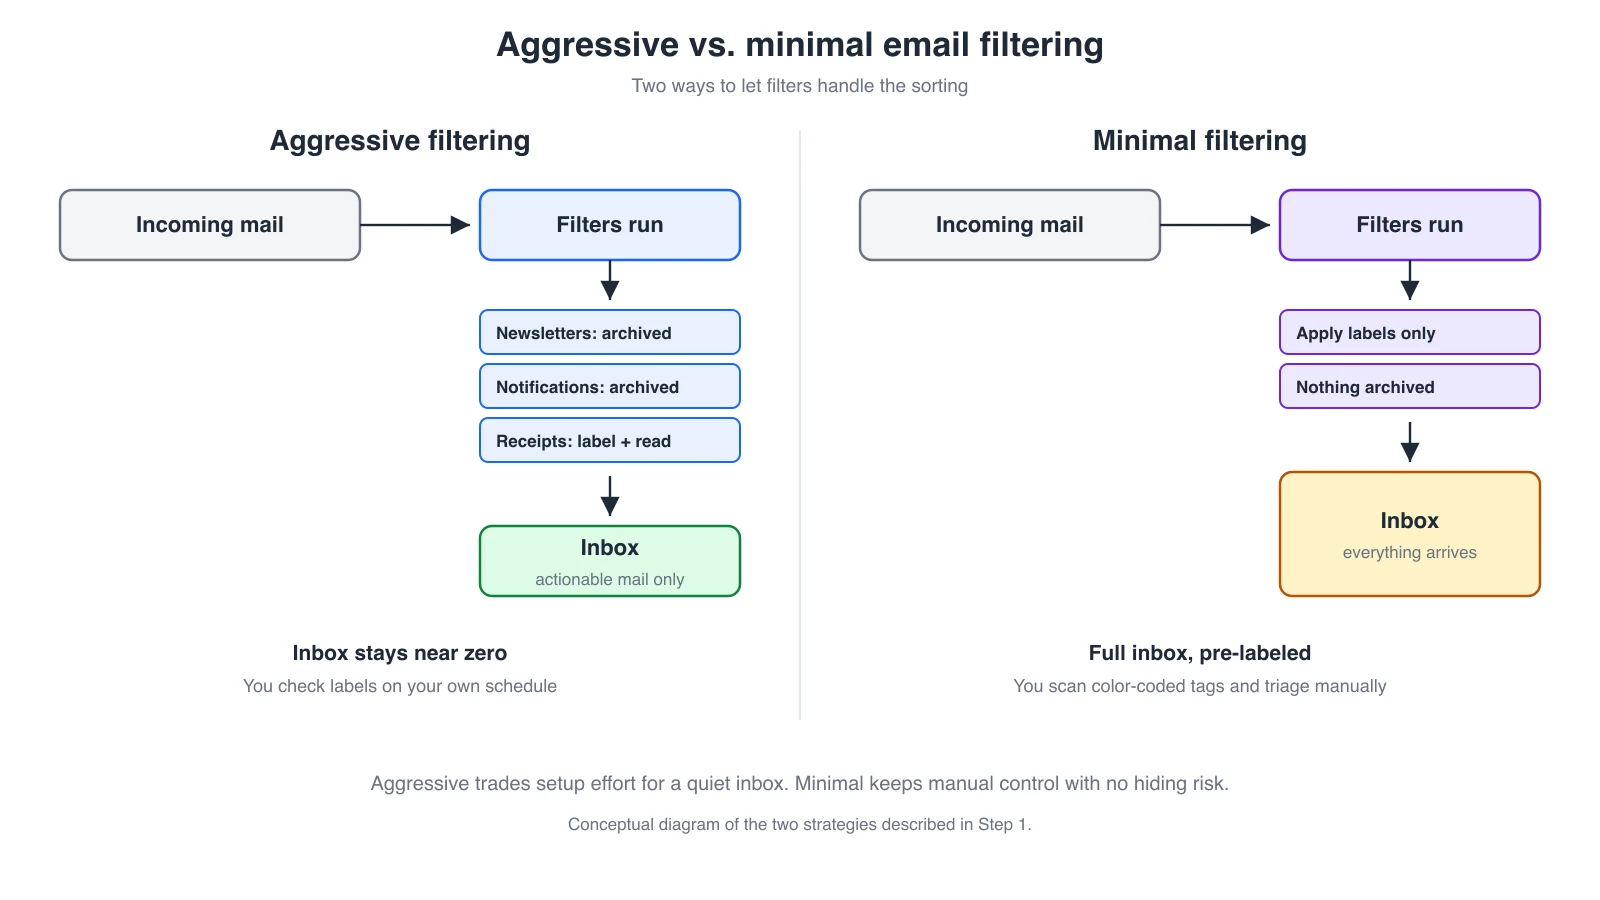
Your filtering philosophy falls on a spectrum between two approaches:
- Aggressive filtering keeps the inbox nearly empty. Filters auto-archive newsletters and notifications and apply labels behind the scenes. You only see messages that need a direct reply.
- Minimal filtering lets messages land in the inbox but pre-labels them with color-coded tags, so you can scan and prioritize visually while keeping manual control.
| Strategy | Best for | Pros | Cons |
|---|---|---|---|
| Aggressive filtering | High-volume inboxes (100+ emails/day), managers, support teams | Near-zero inbox noise; batch processing by category | Misrouted email can hide; more setup work |
| Minimal filtering | Lower-volume inboxes, roles with varied senders | Fast to set up; nothing gets hidden | Still requires daily triage; smaller time savings |
Neither approach is universally better. If dozens of automated notifications arrive daily, aggressive filtering keeps you sane. If most emails need a personal reply, minimal labeling adds context without the risk of burying something important.
Mapping Your Email Categories
Before creating any rule, list the types of messages that fill your inbox. Most email breaks down into predictable buckets:
- Newsletters and marketing: subscriptions, product updates, blog digests
- Automated notifications: app alerts, calendar reminders, shipping updates
- Project threads: ongoing conversations tied to specific work streams
- Client or customer emails: external messages that need timely responses
- Internal team messages: colleague updates, HR announcements, IT notices
Each category becomes one filter and one label. Creating one filter per category scales far better than one filter per sender, and it keeps the system simple enough to avoid the trap of an over-engineered productivity system.
Understanding Filter Priority and Conflicts
What happens when one email matches two filters? A newsletter from a client domain could qualify for both the "Client" label and the "Newsletter" label. The answer depends on your provider:
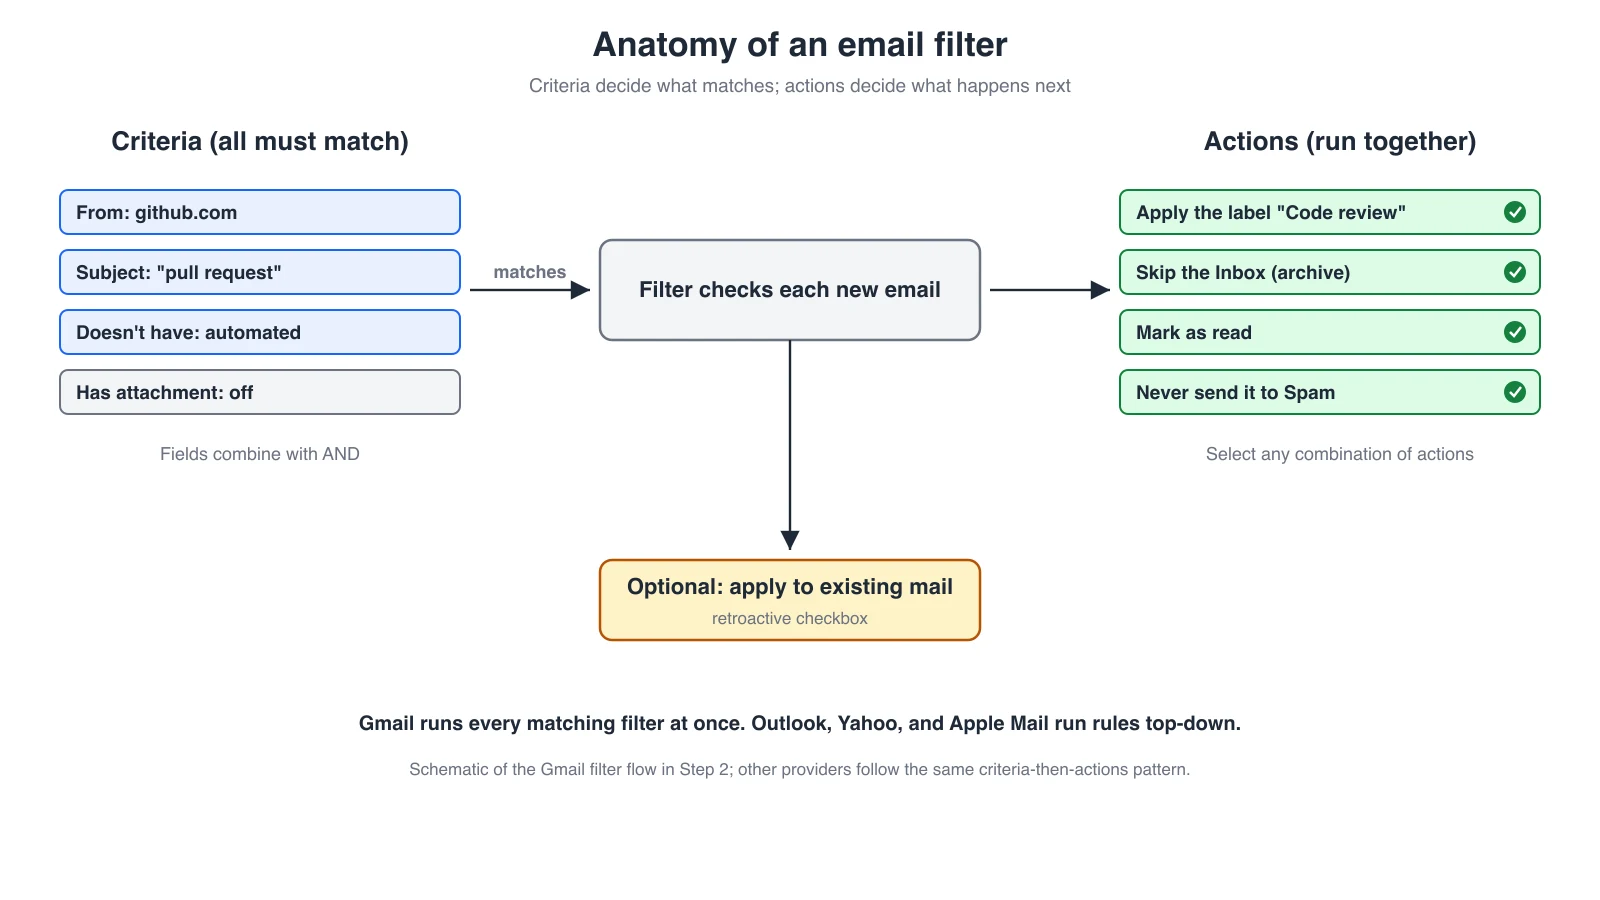
- Gmail: every matching filter runs, and all of their actions stack. One message can receive two labels and be archived and starred at the same time.
- Outlook, Yahoo Mail, and Apple Mail: rules process top-down, and in Outlook a Stop processing more rules option ends the chain after the first match.
The practical takeaway: design overlapping filters so their actions complement rather than contradict each other, and use specific criteria (a sender plus a subject keyword) so each filter targets a narrow slice of mail.
Step 2: Create Your First Filter in Gmail
Gmail gives you three entry points to create a filter, and all three lead to the same dialog. The steps below match Google's official filter documentation.
Three Ways to Create a Gmail Filter
Method 1: From the search bar. The most flexible approach, with access to every criterion field.
- Open Gmail in your browser.
- Click the Show search options icon (the slider icon) at the right end of the search bar.
- Fill in your filter criteria in any combination of fields.
- Click Search to preview which existing emails match (optional, but strongly recommended).
- Click Create filter at the bottom of the search panel.
- Select the actions Gmail should apply to matching messages.
- Check Also apply filter to matching conversations if the rule should also process existing emails.
- Click Create filter to save.
Method 2: From an existing email. Check the box beside one or more messages, click the three-dot More menu in the toolbar, and choose Filter messages like these. Gmail pre-fills the sender address; adjust the criteria and finish as above.
Method 3: From Settings. Click the gear icon, choose See all settings, open the Filters and Blocked Addresses tab, and click Create a new filter. This tab is also where you later edit, delete, export, and import filters.
Filter Criteria Fields Explained
Each field narrows which messages match. Use one field or combine several for precision.
| Field | What it matches | Example |
|---|---|---|
| From | Sender address or domain | newsletter@example.com or example.com |
| To | Recipient address (useful for aliases) | the +billing alias on your address |
| Subject | Words in the subject line | Invoice or "Weekly Report" |
| Has the words | Keywords anywhere in the message | unsubscribe or "action required" |
| Doesn't have | Excludes messages containing words | automated |
| Size | Messages above or below a size | Greater than 5 MB (larger:5M in search) |
| Has attachment | Only messages with files | checkbox, no input needed |
Gmail's filter panel has no native date field. For date-based cleanup, put search operators such as newer_than:2d or older_than:30d in the Has the words field. Relative dates shift every day, so date filters suit one-time cleanups rather than permanent automation.
Combining fields is where filters get precise. From set to github.com plus Has the words set to pull request catches GitHub review notifications while ignoring every other email from that domain.
Choosing the Right Filter Action
You can select several actions at once, which is where filters become powerful:
- Skip the Inbox (Archive it): removes the message from the inbox view but keeps it searchable. Ideal for newsletters and notifications.
- Mark as read: pairs well with archiving for messages you want stored but never need to open, like shipping confirmations.
- Star it: quick visual flag for VIP senders or urgent keywords.
- Apply the label: the backbone of any organized filter system; labels work like folders but a message can carry several.
- Forward it to: sends a copy to another address, such as routing leads to a shared sales inbox.
- Delete it: sends matches straight to Trash. Reserve for senders you never want to hear from.
- Never send it to Spam: protects legitimate senders that occasionally get misclassified.
- Always / Never mark as important: overrides Gmail's importance algorithm in either direction.
- Categorize as: routes messages into a Gmail category tab (Primary, Social, Promotions, Updates, Forums).
A single filter can apply a label, skip the inbox, and mark as read together. For GitHub notifications, for example, that combination keeps your unread count clean while every notification stays searchable under its label.
One checkbox deserves special attention: Also apply filter to matching conversations retroactively runs the new filter's actions on existing mail, which is how you clean up months of backlog without selecting messages by hand.
Step 3: Set Up Filters in Outlook, Yahoo Mail, and Apple Mail
Outlook, Yahoo Mail, and Apple Mail each take a different approach, with capabilities Gmail lacks. Here are the exact steps for each, plus the quirks worth knowing before you build.
Creating Rules in Outlook Desktop and Web
Outlook calls filters "rules" and offers one feature Gmail does not: exceptions. A rule can define what triggers it and what should prevent it from firing, in the same setup. The steps below follow Microsoft's rules documentation.
In New Outlook and Outlook on the web:
- Click the Settings gear icon.
- Go to Mail > Rules.
- Select Add new rule.
- Name the rule and choose a condition (sender, subject contains, sent to a specific address, and so on).
- Pick an action: move to folder, mark as read, flag, forward, delete, or categorize.
- Optionally click Add an exception to exclude senders or keywords.
- Decide whether to enable Stop processing more rules so later rules skip matching messages.
- Click Save.
You can also right-click any message and choose Rules > Create rule to pre-fill the sender and pick a destination folder in seconds.
In Classic Outlook for Windows, rule management lives under File > Manage Rules & Alerts > New Rule, with templates such as "Flag messages from someone for follow-up." Classic Outlook can also run rules on demand against existing folders via Run Rules Now.
One caution: rules that depend on local-only features (for example, moving mail to a local data file or running a script) are client-side rules and only execute while the desktop app is open. Stick to server-compatible conditions like sender, subject, and move-to-folder if you switch between interfaces or devices.
Setting Up Filters in Yahoo Mail
Yahoo Mail is simpler than Outlook or Gmail but handles the essentials, with a cap of 500 filters per account according to Yahoo's filter help page.
- Click the Settings gear icon, then More Settings.
- Choose Filters in the left panel.
- Click Add new filters.
- Name the filter and define criteria across From, To/CC, Subject, or Body.
- Choose the destination folder, or Trash to auto-delete.
- Save.
Yahoo processes filters top-down, and the higher filter wins when two match the same email. Reorder with the arrows in the Filters panel. The main limitation: Yahoo only moves messages to a folder or Trash. There is no labeling, forwarding, or mark-as-read action.
Configuring Rules in Apple Mail
Apple Mail on macOS manages rules under Mail > Settings > Rules, documented in Apple's Mail user guide.
- Open Mail, then go to Mail > Settings and click the Rules tab.
- Click Add Rule.
- Name the rule.
- Set whether any or all conditions must be met (this is your OR versus AND switch).
- Define conditions across From, To, Subject, header fields, date received, and more.
- Choose actions: move or copy to mailbox, mark as read, flag with color, forward, redirect, run AppleScript, or play a sound.
- Click OK, then choose whether to apply the rule to existing messages.
Apple Mail's standout feature is running AppleScripts or Automator workflows from a rule, which enables things like auto-saving attachments to specific folders. No other mainstream client offers that level of system integration.
The key quirk: rules created in the Mac app run locally and only fire while the Mac is on and Mail is open. For automation that also works on an iPhone or when the Mac is asleep, create simpler rules directly on iCloud.com instead. Rules process top-to-bottom and can be reordered by dragging.
How All Four Providers Compare
This matrix is the quick way to see what your provider can and cannot do:
| Capability | Gmail | Outlook | Yahoo Mail | Apple Mail |
|---|---|---|---|---|
| Runs server-side (works on every device) | Yes | Yes, except client-only rules | Yes | No (Mac must be on, unless set on iCloud.com) |
| Filter/rule limit | 1,000 | Size-based rules quota (256 KB in Exchange Online) | 500 | No documented cap |
| OR logic within one rule | Yes (search operators) | Within a single condition only | No (one criterion per field) | Yes ("any" toggle) |
| Exceptions inside a rule | Partial ("Doesn't have" field) | Yes, dedicated exception conditions | "Does not contain" only | Via negative conditions |
| Stop processing after first match | No (all matches stack) | Yes | Implicit (top-down, first wins) | Implicit (top-down order) |
| Apply to existing mail | Yes (checkbox) | Yes (Run Rules Now) | No | Yes (apply prompt) |
| Forward as an action | Yes | Yes | No | Yes |
| Scripting/automation hooks | No | Limited (client rules) | No | AppleScript and Automator |
Gmail is the easiest to set up and forget because everything runs server-side. Outlook's exceptions and stop-processing make it the strongest for tiered priority systems. Apple Mail wins on local automation. Yahoo covers basic folder routing and nothing more.
Step 4: Master Advanced Filter Logic and Multi-Condition Rules
Single-condition filters handle obvious cases. Real inboxes need filters that catch five teammates at once, or match a keyword only when it comes from a specific domain. That is where combined logic comes in.
Using OR Conditions and Multiple Addresses
One filter can catch messages from several senders. In Gmail's Has the words field, or directly in the search bar before creating the filter, use the OR operator:
from:(alice@example.com OR bob@example.com OR carol@example.com)
OR must be capitalized; lowercase "or" is treated as a plain keyword. Curly braces are a shorter equivalent, with spaces acting as OR: from:{alice@example.com bob@example.com}. Avoid comma-separated addresses in the From field, because the filter engine can read commas inconsistently and the filter silently stops matching.
In Outlook, add multiple senders to a single condition and they are treated as OR by default. Cross-field OR ("from Alice OR subject contains Invoice") needs separate rules, because Outlook only supports OR within one condition.
What Gmail Can and Can't Match (No Wildcards)
Gmail's search and filter syntax does not document an asterisk wildcard, despite what many tutorials show. Patterns like from:*@example.com are unnecessary at best and unreliable at worst.
The good news: you rarely need one. Entering a bare domain in the From field, such as example.com, already matches every address at that domain. Combining domains with OR covers multiple organizations in one filter:
from:(amazon.com OR target.com OR walmart.com)
What Gmail genuinely cannot do is partial matching inside an address, such as "any sender whose name starts with sales-." If your workflow depends on pattern matching, handle it with a plus-addressing alias strategy (give each service a +tag alias and filter on the To field) or with Apple Mail rules, which support "begins with" conditions.
Date operators such as after:2026/01/01 or newer_than:7d work in the Has the words field and are most useful for one-time retroactive cleanups, since relative dates keep shifting.
Combining Multiple Criteria for Precision Filters
AND logic happens automatically when you fill in multiple fields: every condition must be true. Parentheses create OR groups within a field, and the fields combine with AND:
from:{github.com gitlab.com} subject:("pull request" OR "merge request")
This catches pull and merge request notifications from either platform while ignoring everything else they send. Three combinations that cover common real-world needs:
- Every email from a client organization: From set to
clientdomain.com, with the client's label applied and Never send to Spam checked. - Project threads from specific collaborators:
from:{teammate1@example.com teammate2@example.com} subject:("Project Atlas")catches project mail from those two people and skips their unrelated messages. - Large file transfers: Size set to greater than 5 MB (
larger:5Min the search bar) with Has attachment checked, labeled "Large Files" so shared documents are easy to find and old ones easy to purge.
In Outlook, the visual rule builder chains conditions with AND and adds exceptions that block the rule; Stop processing more rules turns the rule list into a priority chain (VIP rules first, catch-alls last). In Apple Mail, the any/all toggle at the top of each rule switches between OR and AND without any syntax.
Step 5: Apply Practical Filter Presets to Common Scenarios
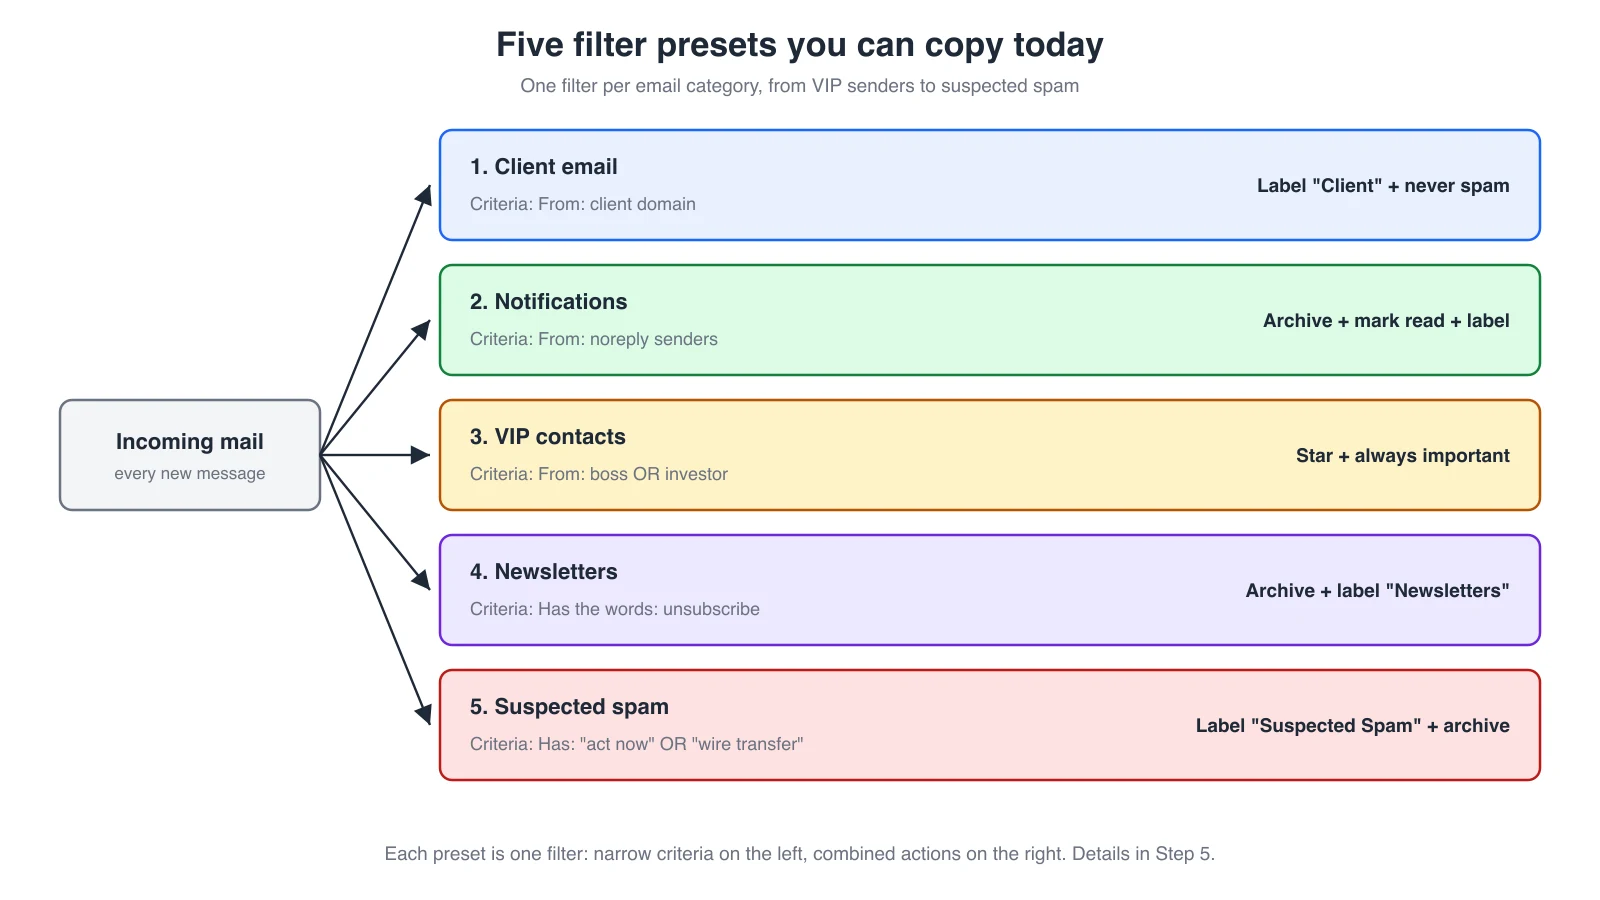
Knowing the syntax is one thing; knowing what to build is another. These five presets solve the most common inbox problems and work immediately without fine-tuning.
Five Filter Presets You Can Copy Today
1. Auto-label client email by domain. Criteria: From set to the client's domain, such as acmecorp.com. Actions: apply the label "Client: Acme" and check Never send to Spam. Domain matching catches everyone at the organization, including new hires and automated systems, without listing addresses one by one. Edge case: if a contact uses a generic provider instead of a company domain, list their individual addresses with OR instead.
2. Archive automated notifications but keep them searchable. Criteria: From set to senders such as notifications@github.com, or Has the words set to "do not reply" OR noreply. Actions: Skip the Inbox, Mark as read, apply the label "Notifications." Edge case: some services send both pings and action-required mail from one address, so add a Doesn't have entry such as "action required" to let important messages through.
3. Star email from VIP contacts. Criteria: from:(boss@example.com OR investor@example.com). Actions: Star it, Always mark as important, Never send to Spam. Three safety nets ensure VIP mail is never buried or deprioritized. Edge case: a VIP joining a long group thread stars the whole conversation, so review your starred view occasionally.
4. Batch newsletters into a reading label. Criteria: Has the words set to unsubscribe, which nearly every marketing email contains because laws such as CAN-SPAM require it. Actions: Skip the Inbox, apply the label "Newsletters," and optionally Mark as read. Read them in batches on your schedule. Edge case: receipts and account alerts sometimes include "unsubscribe" too; exclude them with Doesn't have entries such as receipt or "payment confirmation".
5. Flag spam that slips through. Criteria: Has the words set to "act now" OR "limited time offer" OR "wire transfer" OR "congratulations you've won". Actions: apply the label "Suspected Spam" and Skip the Inbox. This is a secondary net behind the provider's spam filter, routed to a review label rather than deleted outright. Edge case: enthusiastic but legitimate promotions can match; whitelist those domains in Doesn't have.
Once you have labels and filters running, pairing them with reusable email templates for your most common replies compounds the time savings.
Applying Filters to Your Existing Inbox
New filters only affect future messages unless you tell the provider otherwise.
In Gmail: check Also apply filter to matching conversations on the action screen during creation. If the filter already exists, open Settings > See all settings > Filters and Blocked Addresses, click edit, continue to the action screen, check the box, and save. Google's filter documentation linked in Step 2 covers the same flow.
In Outlook: Classic Outlook for Windows runs rules on demand via File > Manage Rules & Alerts > Run Rules Now, where you pick the rules and the target folder. New Outlook and Outlook on the web can run an individual rule against existing mail from the rule's entry in Settings > Mail > Rules, but bulk runs still belong to the classic desktop client.
A practical approach: build all five presets first, then apply them retroactively in one pass so historical mail is sorted once rather than five times.
Step 6: Test, Edit, and Maintain Your Filters Over Time
A filter that worked three months ago can silently break when a sender changes address or a project ends. Three habits keep the system reliable: test before committing, know where to edit, and audit quarterly.
Testing a New Filter Before Going Live
Before clicking Create filter, run the exact criteria as a search. If the results show the messages you expect and nothing else, the logic is sound. If irrelevant mail appears, tighten the criteria first. The same search-first check works in Outlook and Apple Mail.
When a filter stops behaving, the cause is almost always one of these:
- Typos or extra spaces in criteria. A filter for
clent@example.comcatches nothing and never complains. - The retroactive box was left unchecked. The filter works, but only on mail that arrived after creation.
- Category tabs hide the result. A filter can run correctly while the message still lands in the Promotions or Updates tab and looks missing from Primary. Add a Categorize as action, or disable unused tabs under Settings > Inbox > Categories.
- Conflicting actions. Two filters marking the same message as both important and not important produce unpredictable priority. Consolidate overlapping filters.
- Stale filters. Rules built for finished projects keep routing mail to places nobody checks.
Viewing and Editing Existing Filters
In Gmail, Settings > See all settings > Filters and Blocked Addresses lists every filter with its criteria and actions. Click edit to change criteria or actions (and re-check the retroactive box if needed), or delete to remove one. Gmail has no bulk delete, so export your filters first from the same page to keep a backup.
In Outlook, manage rules under Settings > Mail > Rules (web and New Outlook) or File > Manage Rules & Alerts (classic). Order matters because processing is top-down; drag rules to reorder. In Apple Mail, rules live under Mail > Settings > Rules and reorder by dragging as well.
Running a Quarterly Filter Audit
Set a 15-minute calendar reminder every 90 days:
- Remove outdated rules tied to finished projects or former contacts.
- Consolidate duplicates by merging per-sender filters into one filter with OR logic.
- Verify rule order in Outlook, Yahoo, and Apple Mail so high-priority rules still sit on top.
- Test critical filters by searching for recent messages that should have matched.
- Resolve conflicts where filters apply contradictory actions to overlapping criteria.
Ten precise, maintained filters outperform fifty neglected ones. The goal is reliable automation you trust, not maximum automation.
Step 7: Turn Filtered Emails Into Organized Team Workflows
A clean inbox is not the finish line. A project update labeled "Project Atlas" does not become a completed task because it was sorted, and a client request filed under "Client: Acme" does not track itself to resolution. Filters organize information; workflows turn it into action.
Turning Filtered Emails Into Actionable Workflows
Each label you created is a stream of incoming work that demands a different response:
- Project updates need to become tasks with owners and deadlines.
- Client emails need response tracking, especially when several teammates touch the same account; an AI email generator can help draft those replies faster.
- Newsletter insights contain ideas and competitive intelligence that belong in a shared knowledge base, not an unread label.
- Internal threads carry decisions and context that new teammates will need months from now.
Without a second layer at the destination, labels become filing cabinets nobody opens: organized clutter instead of messy clutter, but clutter all the same.
Connecting Your Inbox Organization to Team Knowledge
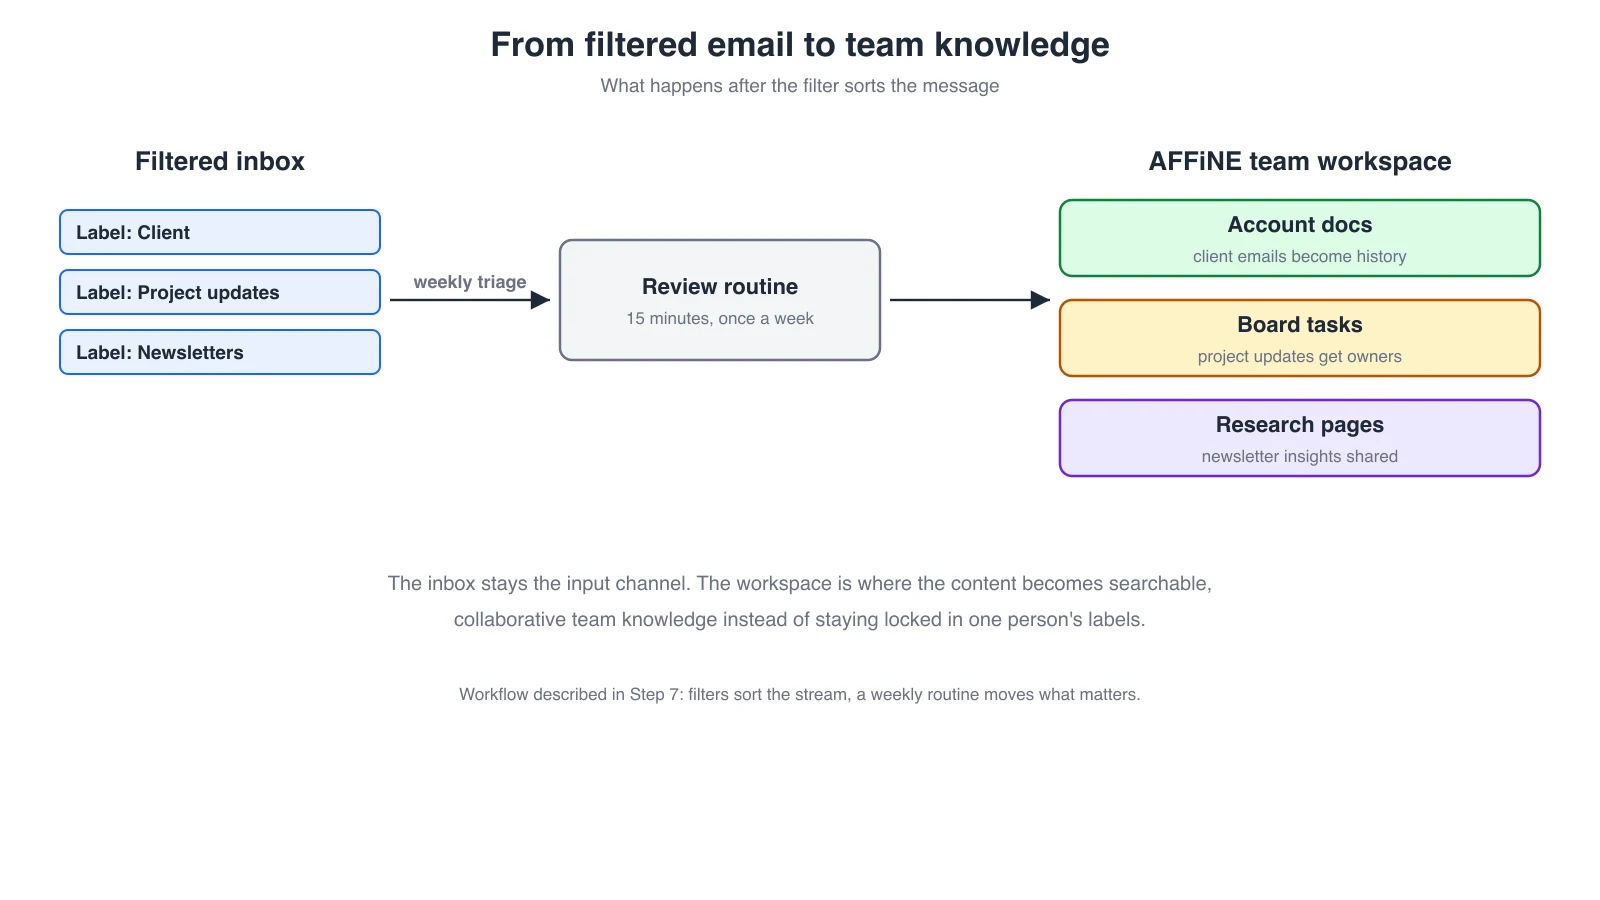
The fix is a weekly routine that moves the actionable content out of each filtered stream and into a shared workspace. With AFFiNE, that looks like this: a Monday scan of your "Client" label becomes updated account docs, project updates become tasks on a shared board, and newsletter insights become research pages the whole team can build on. The filtered inbox stays the input channel; the workspace is where knowledge lives.
This is the same principle behind a centralized team knowledge base and a personal second brain: information only pays off where people can find and act on it. If you want a head start, the AFFiNE template library includes project boards and knowledge base starters you can adapt for email triage.
Next Steps to Build Your Complete Email Organization System
You now have the full filter lifecycle: strategy, setup on four platforms, advanced logic, presets, maintenance, and a workflow connection. What remains is starting small enough that the system actually sticks.
Your Quick-Start Filter Checklist
- Identify the three senders or categories flooding your inbox the most.
- Create one label filter for your most important client or team.
- Create one archive filter for automated notifications you never read.
- Test each filter as a search query before saving it.
- Set a calendar reminder 90 days out for your first filter audit.
Building a System That Grows With You
The best filter system is not the most complex one; it is the one you actually maintain. Start with one well-crafted filter for your noisiest category, watch it work for a week, then add the next when a recurring pattern earns automation. One reliable filter saves more time than twenty half-finished rules fighting each other.
Frequently Asked Questions About Email Filters
1. How do I create a filter in Gmail to automatically sort emails?
Open Gmail, click the Show search options icon in the search bar, enter your criteria (sender, subject, or keywords), and click Create filter. Choose actions such as applying a label, skipping the inbox, or marking as read, then save. Check Also apply filter to matching conversations to process existing email retroactively. The full walkthrough with all three creation methods is in Step 2 above.
2. Why are my Gmail filters not working?
The usual causes are typos in the criteria, the retroactive checkbox left unchecked, Gmail's category tabs masking where mail landed, or two filters applying contradictory actions. Run the filter criteria as a search first to verify what matches, then review Settings > Filters and Blocked Addresses for duplicates. If messages never arrive at all, filtered or not, that is a different problem; see our guide on what to do when Gmail is not receiving emails.
3. Can I create one filter for multiple email addresses?
Yes. In Gmail, use the capitalized OR operator in the Has the words field or search bar: from:(alice@example.com OR bob@example.com). The curly-brace shorthand from:{alice@example.com bob@example.com} does the same thing. In Outlook, add multiple senders to a single rule condition and they are treated as OR by default.
4. How often should I review and update my email filters?
A quarterly audit every 90 days keeps the system reliable. Remove rules for completed projects and former contacts, merge redundant filters with OR logic, verify rule order in providers that process top-down (Outlook, Yahoo, Apple Mail), and test critical filters against recent mail.
5. What is the difference between email filters in Gmail, Outlook, and Apple Mail?
Gmail runs everything server-side and applies all matching filters at once; it has no dedicated exception conditions, though the Doesn't have field covers most exclusion needs. Outlook builds conditions, actions, and exceptions into one rule and offers Stop processing more rules for priority chains, but client-side rules only run while the desktop app is open. Apple Mail offers an intuitive any/all toggle and unique AppleScript automation, but rules run locally on your Mac unless you create them on iCloud.com. Yahoo Mail is the simplest: move-to-folder actions only, with a 500-filter cap. The capability matrix in Step 3 compares all four side by side.
6. Can I export or back up my Gmail filters?
Yes. Go to Settings > See all settings > Filters and Blocked Addresses, select the filters you want, and click Export at the bottom of the page. Gmail downloads an XML file you can re-import from the same page, which is the safest way to back up your system before a big cleanup or to copy filters between accounts.